How I Taught Myself To Paint


As a teenager I was quite obsessed with Lord Leighton and attempted a copy of ‘Flaming June’ (image 1) which was pretty good on the drawing front but weak on the painting. I drew out a full wall replica of Cymon and Iphigenia (image 2) with the intention of doing a mural but I never got as far as applying paint. Another favourite from Lord Leighton is the Lament for Icarus (image 3) which I suspect sparked my love of painting birds because those wings are just spectacular! (Dove, image 4, by me.)
My Formative Years
From my earliest memories art was always something that I was good at. I remember getting praise and crushing criticism for my artwork from the very beginning of school. I won a prize for my Easter collage with chicks hatching out of eggs and the crushing criticism I mentioned? Well I must have been about five years old and I had painted a brown bunny. Do you remember those awful powder paints they have in primary schools? I mixed my one tone brown paint only to be deeply frustrated that the shape of the hindleg, which I was particularly proud of got lost under the substandard paint. When it had dried I went back in with a black marker to define the shape and outline of that hindleg and continued the black line all around the bunny. The headmaster came in and upon observing my painting told me off for the black line because ‘things in real-life do not have a black line around them’. I was crushed. It seems funny now but that had a deep impact on my young and sensitive creative self-esteem. The creative mind is fragile thing!
You have probably heard the quote by Picasso that ‘All children are artists. The problem is how to stay an artist when the child grows up’. There is a freedom of expression and lack of self-judgement that comes with children’s art. For me personally I think I have always had a measure of self-doubt but I suspect that has more to do with my upbringing than my abilities. I knew I was good at art but never felt I had the encouragement and opportunities to become great. It was my thing and most of my time was spent drawing rather randomly: princess dress designs, kangaroos and geometric patterns to name a few.

The Importance of Encouragement
In my final year of primary school I had the most wonderful and caring teacher, Mrs. Moore. She encouraged me so much with my art. I remember doing wonderfully illustrated projects with expressive cover pages and hand drawing interesting made up fonts. She brought in life models for us to draw and took us out into the grounds of the school to draw. One time she said to me ‘I wish I could draw like you’. This touched me so deeply and meant the world to me to get that kind of positive affirmation.
Unfortunately that was where it ended, my secondary school was a creative wasteland. A joy-sucking establishment that crushed the hopes and dreams of children. My art teacher at this school was in fact an English teacher who covered for the real art teacher and ended up staying in the position. Her teaching did not extend beyond chucking a few random objects on a table in the middle of the room, calling it a still life and leaving us to it. I do not remember her teaching me anything. The art materials were basic, the powder paints and if we were lucky occasionally some poster paints. I doubt that even after my years of painting experience now I could make anything look good on cheap thin paper and lumpy powder paints. This is probably why I focused on pencil drawing, mostly portraits, which developed pretty well. I mostly copied from photographs and did a lot in my spare time. To be fair my Craft, Design and Technology teacher did make up a bit for the failings of my art teacher and taught us some invaluable lessons on perspective, and using a grid to copy and scale up images but this was tempered by him being a bit of a pervert (does every school have a bit of a pervy male teacher?) who often used to embarrass me in front of the class with his favouritism for me and inappropriate innuendoes which I got endlessly ribbed for.


Two of the only things of real value I learnt at school from my CDT teacher were one and two vanishing point perspectives and using a grid to scale up images. The grid system has been so useful when working on a large canvas, making sure everything stay in proportion.
Creative Trials
For work experience at school I really wanted to get a placement doing set design and had high hopes or delusions perhaps of helping to paint a set for Swan Lake at the Royal Oprah House or something equally fabulous. What I got was a placement at a fellow students mum’s place of work, an interior design company on a trading estate in Chessington. I spent my two weeks cutting out fabric and wallpaper samples and furniture from catalogues (this was pre internet and CAD!).
I went on to do my A’ levels in Art, Photography and English Lit. My experience on the Art A’ level was not a positive one, when it came to painting I was woefully inexperienced compared to my fellow students who all seemed well acquainted with proper painting materials, not primary coloured poster paints! This was my first introduction to acrylic paints. I didn’t like them! My art tutors seemed to get endlessly frustrated with me, they kept telling me to loosen up but I never quite managed to paint in a way that pleased them. At the end of my first year I wanted to drop out. It was making me feel like a terrible failure. My head of year happened to also be my photography tutor which I was doing well in and he persuaded me to stick it out.
I think my basic problem was that I desperately wanted classical training. I wanted to learn to paint like the Masters and this really wasn’t on offer. They wanted you to be alternative to do something that hadn’t been done before. This was also the case for my dissertation. I wanted to write about Van Gogh, they advised me not to because it was such a common topic. They advised me to do something like the representation of disabled people in art. I can’t stand doing something just for the sake of being different so I stuck to my guns and did my Van Gogh dissertation. I came out with an A grade and a fingers up to my tutors but it squeezed the love of art out of me. I had a look at degree courses but none of them offered what I was looking for. There was too much conceptual, installation and video art on the syllabus for my liking. I just wanted to paint beautiful paintings.
I left college and left art for some time. I started refurbishing properties and got into doing specialist decorating techniques, woodgraining, marbling, hand cutting complex stencils, handpainting floors etc. Eight years later after doing a few paintings to dress properties that I had refurbished I decided to give art another go but I wanted to learn to paint in oils which we didn’t even touch on during my A’ level.

George Stubb’s Whistlejacket.
Where The Real Learning Started
Where to start? This is the overwhelming part. Painting in oils can seem intimidating to someone teaching themselves. I read what I could on techniques but it was either really technical or too simple. I had really basic questions that I wanted answering and no-one to ask. What brushes should I use, what mediums, what about drying times? Should I work wet into wet or in glazes? I read about people working in layers but didn’t know if I was supposed to let the paint dry in-between. The questions went on and on.


It was George’s Stubb’s magnificent portrait of Whistlejacket in National Gallery (above) that inspired me to start painting horses.


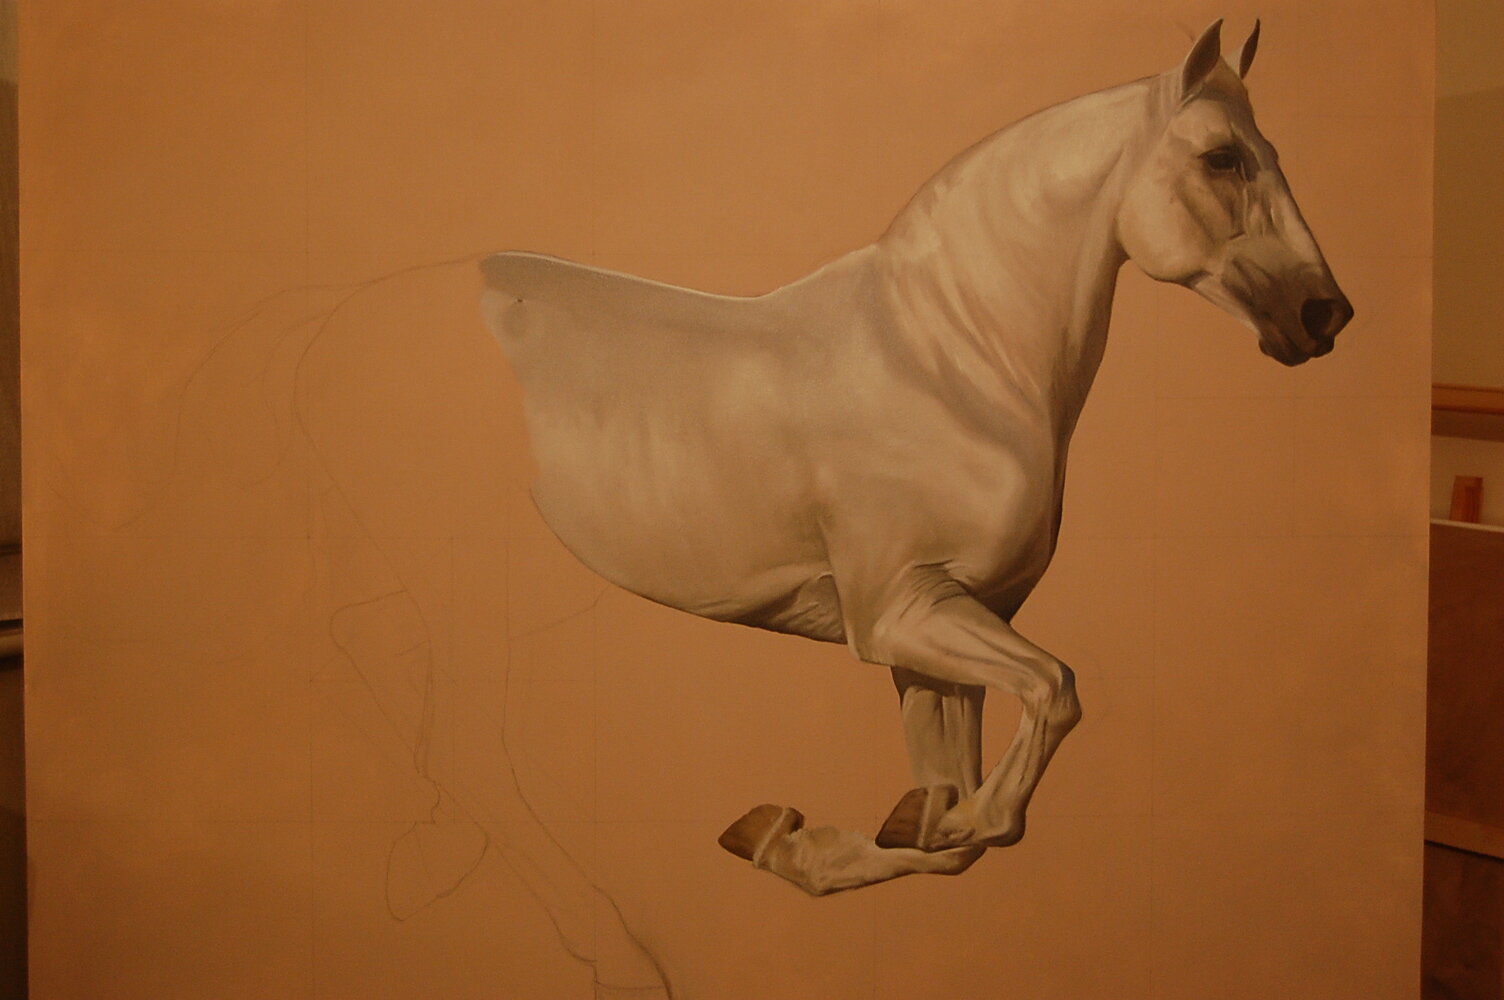


My first attempt at a horse was the white horse you can see above (first photo in the set of 8). The painting got damaged and I painted a replica about 18 months later (photo no.2) You can see the vast improvement between the first attempt and the second (photos 3-8 above are the progress shots of the replica being painted)
I visited the National Gallery in London lots, examining my favourite paintings, trying to dissect the techniques used. My very first paintings were quite simple whilst I was getting to grips with the materials. I had a bit of an intense love/hate relationship with painting in those early days. I used to torture myself with my lack of knowledge and experience and get so frustrated when my work didn’t match up to my expectations. Often I would turn a painting around whilst it was drying so I didn’t have to look at it. My sister and I (who has equally tortured herself over her writing) call this the ‘Masterpiece Complex’. It is a ridiculous and unrealistic expectation that we place on ourselves to produce a masterpiece. Self-judgement of this kind is crippling. So if you are just starting on your journey and want to learn to paint, my biggest piece of advice is to leave the judgement at the door! Channel the freedom of expression children have. Enjoy colour, enjoy experimenting and know that every painting you do good or bad is a building block and you are laying the foundation of your painting practice. The foundation of a building doesn’t need to be pretty but it is very necessary. If your fear of being crap, or fear of failure stops you from painting you will never improve. You don’t take up running and expect to match Usain Bolt straight away. It takes time, commitment and perseverance to reach your goals, but it can be enjoyable along the way if you…
Don’t judge yourself
Invest in good materials
Keep it simple to begin with
Watch tutorials
Reach out to other artists for advice
Practice your drawing skills
Preparation for the Painting
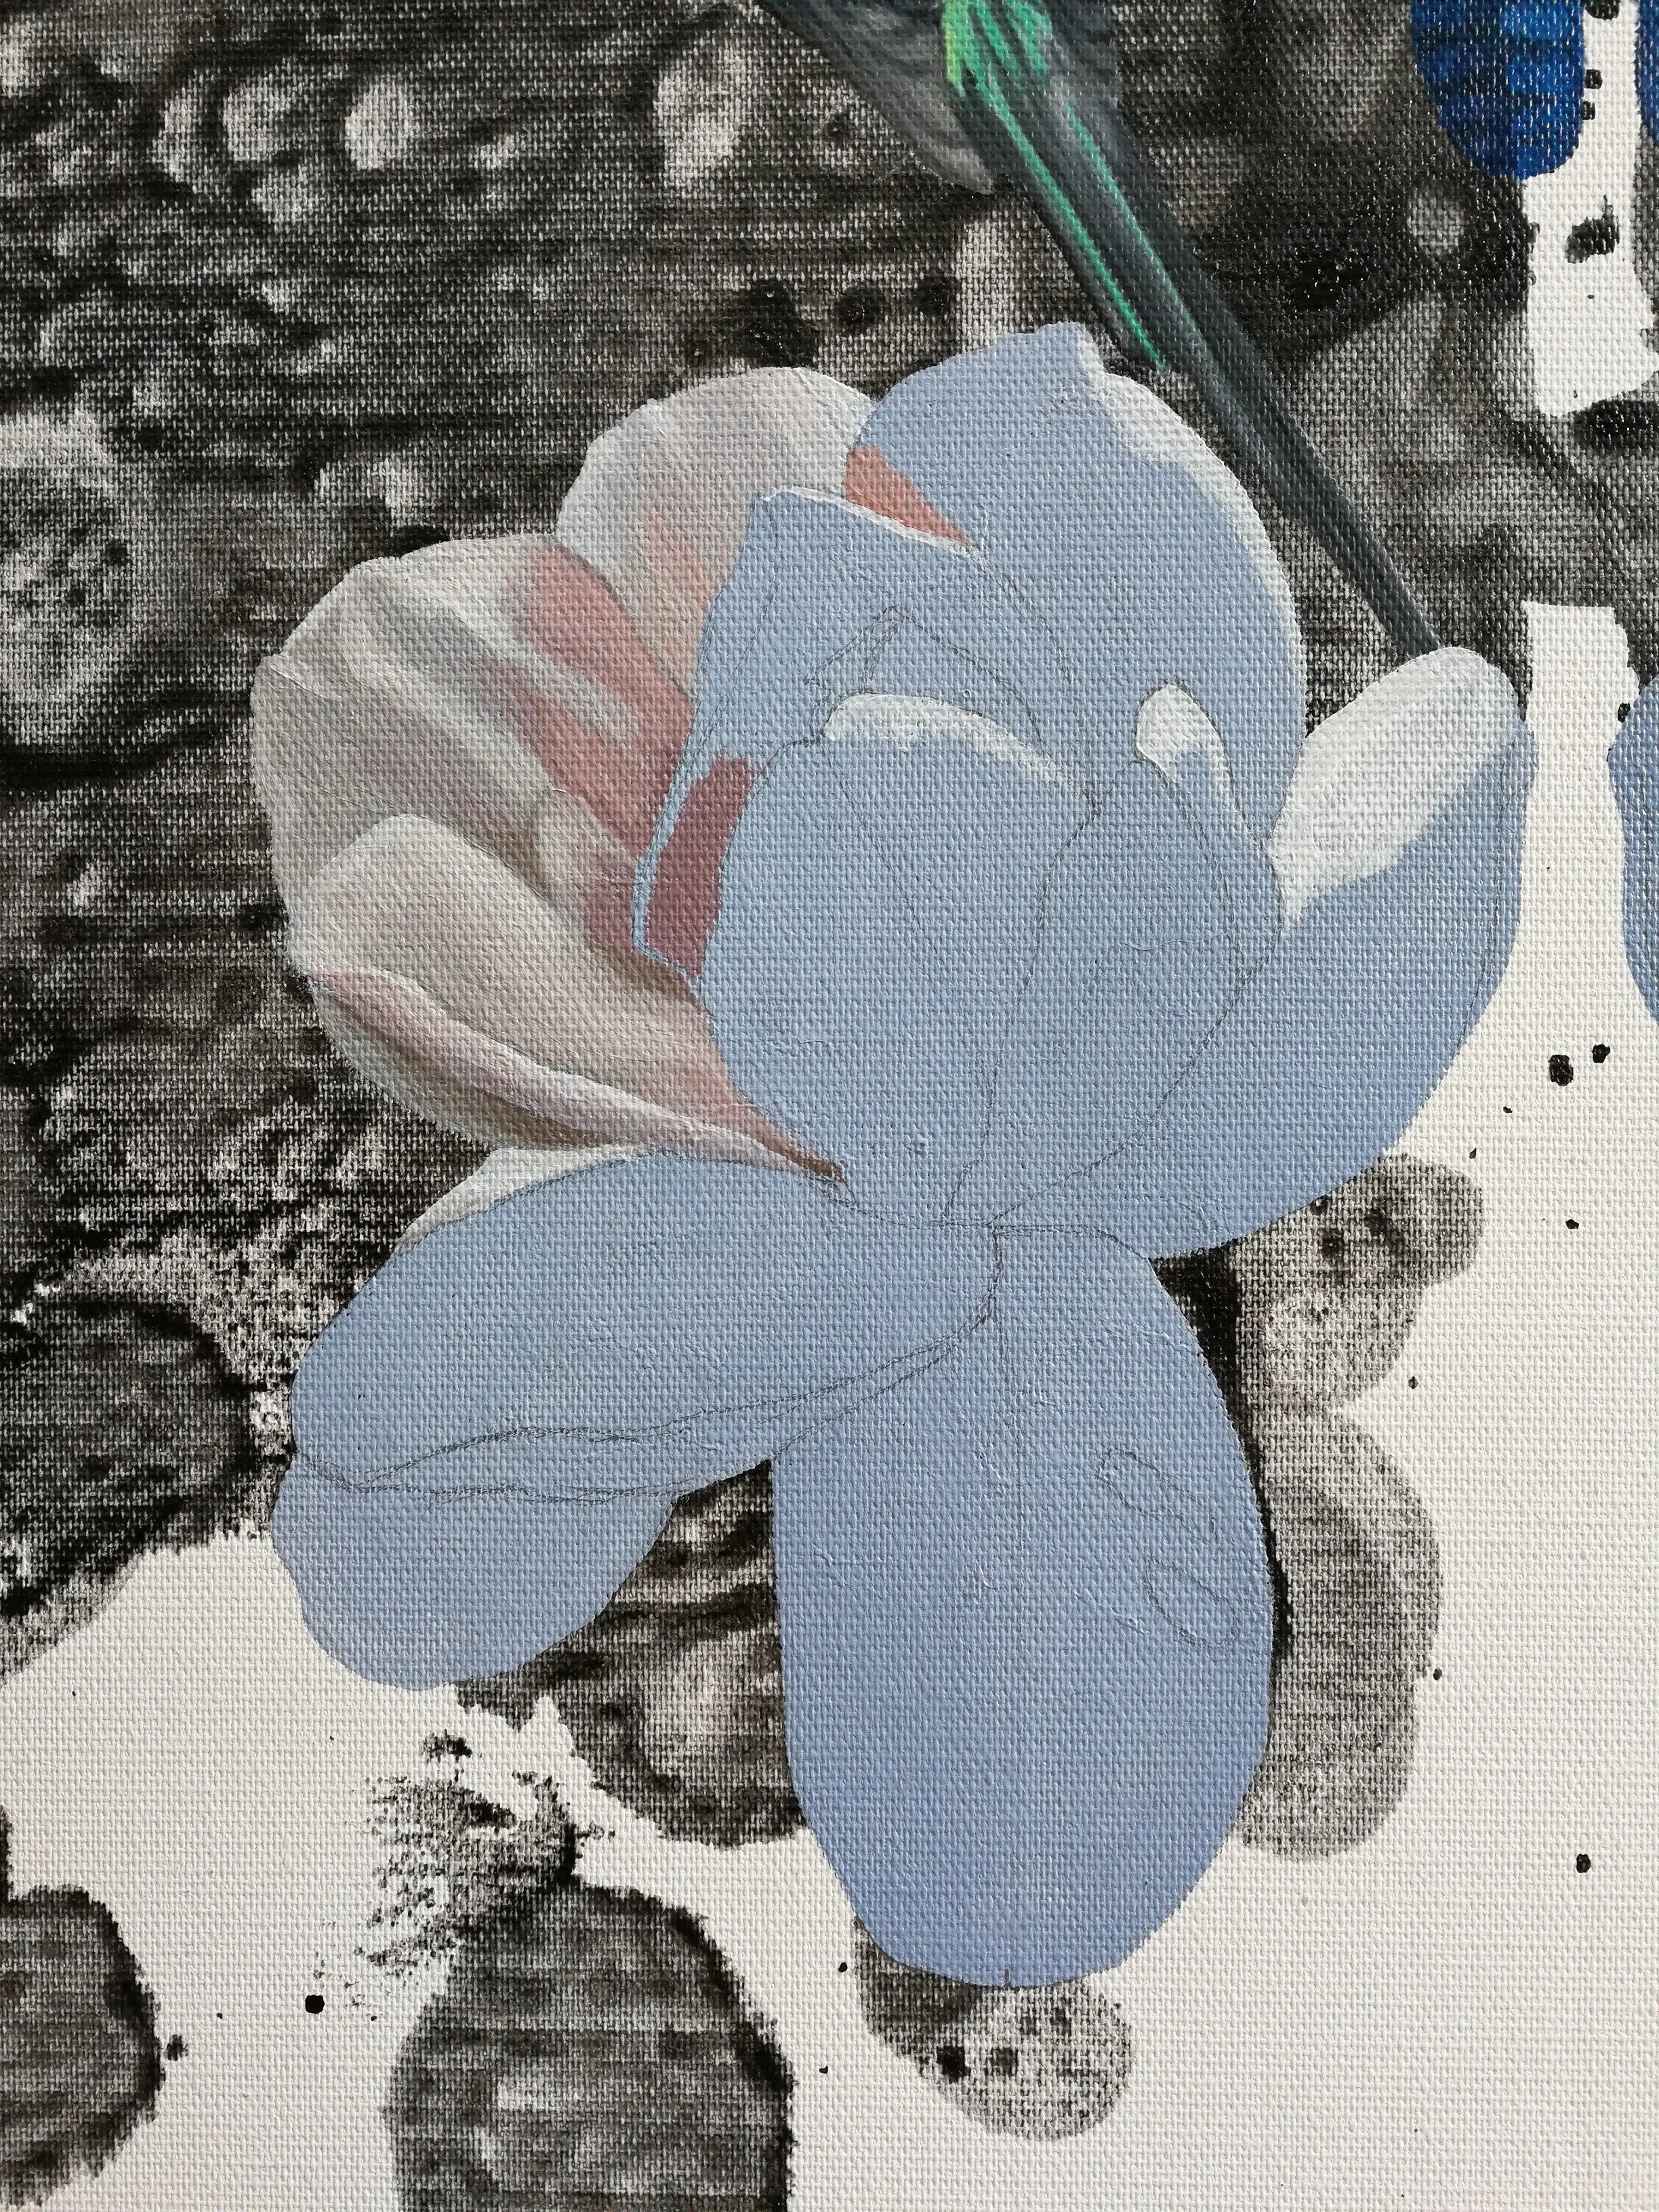
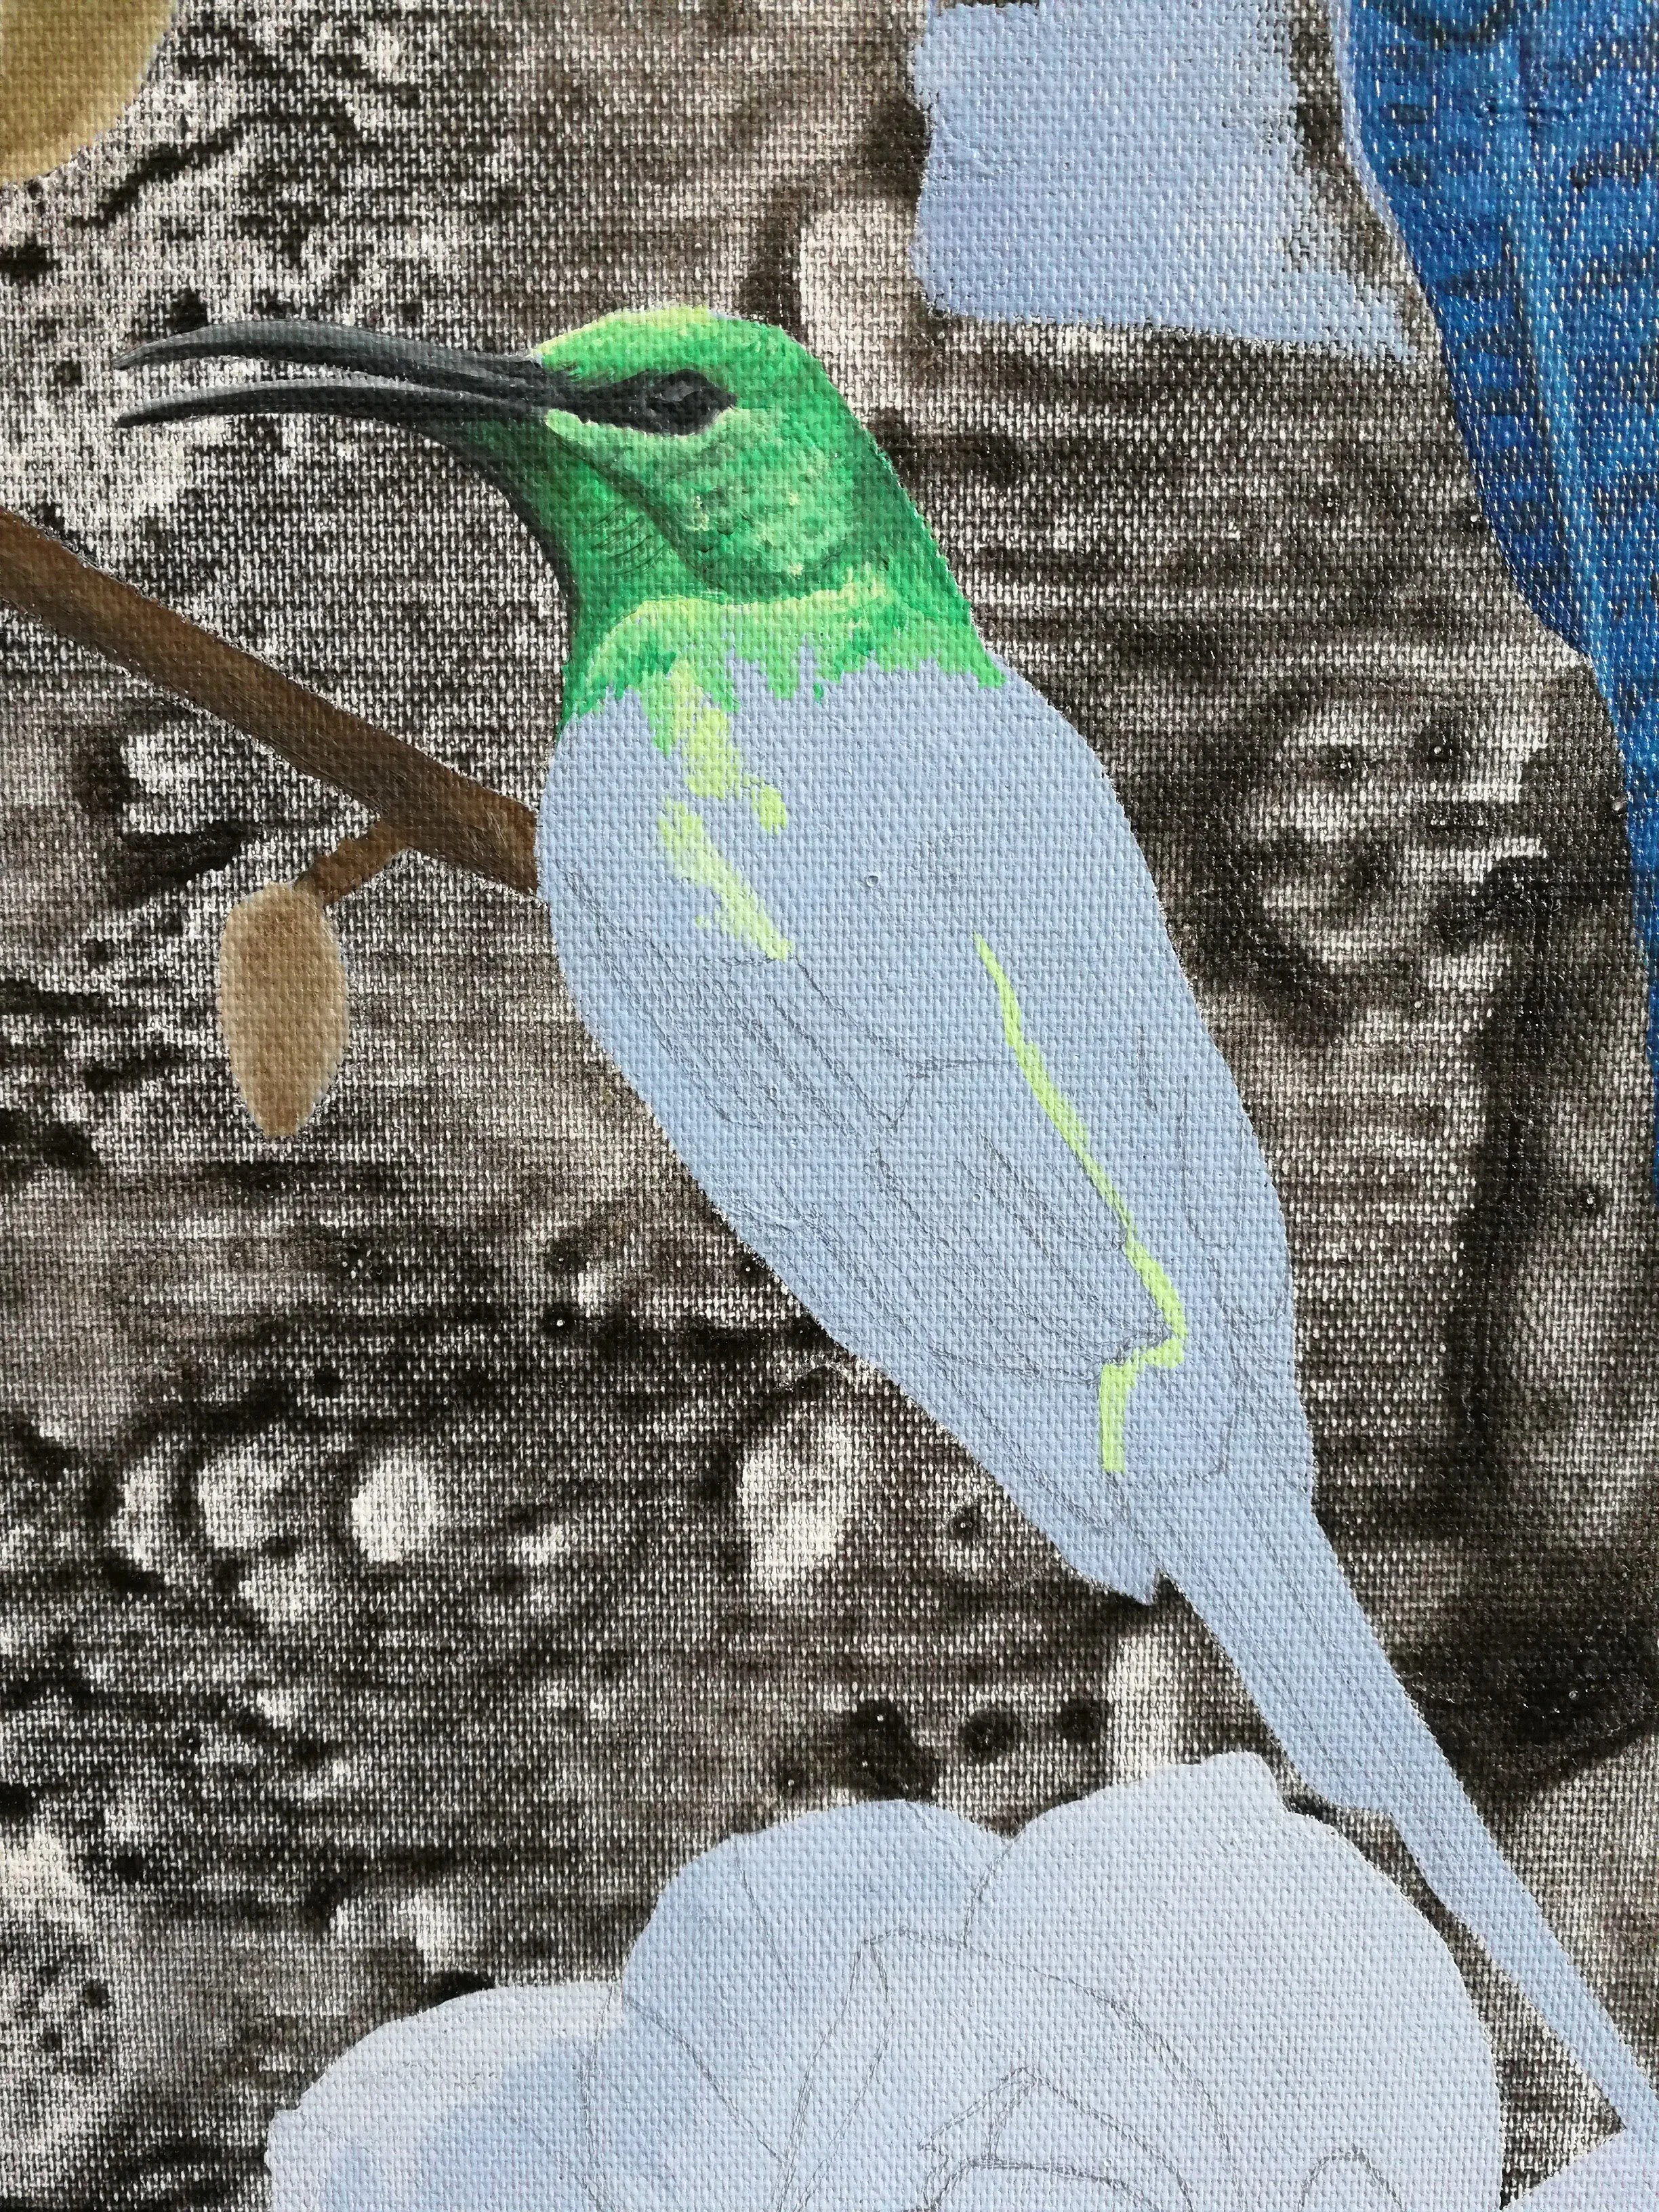
So here are some things I figured out along the way that work for me. They may not be the ‘proper’ way but might be useful to you if you are just getting to grips with oils. To start out with I would say use a ready primed canvas as the uniformity of the surface is one less thing to contend with. I never work straight onto a white surface. Depending on the predominate colours that will be in the finished painting I always lay down a mid-tone base colour first. It can be quite washy. I often go for a bit of burnt umber and paynes grey thinned with Turpentine or Sansodor which is less smelly. Once that base colour is dry I draw out the main elements of the painting. If I am doing something like a portrait or an animal I use a grid to enlarge my source image accurately. Rather than draw onto my source photograph I just fix a sheet of acetate with the grid on over the photo, this means you can flick between and see your source image with or without the lines. See the photos further up for an example of a grid enlargement. If there are any terms and techniques you are unsure of Google and Youtube should have it covered. When I was starting out I didn’t have a computer or smart phone and used to have to get the bus to the local library to access the internet. So basic!
Paint Colours and Brands
I have a basic set of colours (listed below) which I pretty much stick to and then add more specific colours depending on my subject. I mostly use Winsor & Newton professional oils but also have Michael Harding and Sennelier brands in my paint draw.
Titanium white
Cadmium yellow
Yellow ochre
Cadmium red
Alizarin crimson
Burnt Umber
Paynes grey
Sap green
Winsor green
French ultramarine
Cerulean blue
Lamp black


Laying Down Paint
I lay out my paint colours on a wooden palette light to dark, I have a small clip-on receptacle for my turps/sansodor. I tend to only use turpentine now to thin the paint. For a long time I used liquin as this gave a much more uniform finish to the paint than oil mediums such as linseed oil or stand oil but I don’t even use that now. You may have heard of the ‘fat over lean rule’ for painting in oils. Very basically this means that your first layers of paint should be thinner than the subsequent ones. Oil paint thinned with a solvent such as white spirit, turpentine or sansodor dries more quickly and this is considered the ‘lean’ paint. Oil paint on it’s own or with the use of an oil medium such as linseed, stand, walnut oil etc is the ‘fat’ paint. To allow the paint to dry/cure fully in a sound way it is advisable to apply the paint firstly in lean layers and building the oil content gradually in the later layers so that you do not apply a quick drying layer over a slow drying layer as this could cause instability and maybe cracking. Don’t get caught up on this though. Keep it simple to start, just use a bit of turps like I do!
Because my work is quite fine and detailed I use soft hair brushes mostly sable but some synthetic too. I use a separate brush for light tones, another for medium and another for darks. Having separate brushes for different colours prevents your colours from muddying. I start by laying down the lightest areas of paint first as it keeps the colours fresher than if you try and add white next to a darker colour. Next I add the darkest details, then fill in the mid-tones gently overlapping areas of colour to soften the transition.


As you can see from these progress shots, I work on a mid-tone neutral colour base which gives you a great starting place for laying down your lightest values first. Next I add the darkest values and pull it all together with the mid-tones.
Once I have got the first layer of paint down I let it dry, usually for a couple of days, the darker colours often dry over night with the white areas taking the longest to dry. Obviously this varies according to the temperature in which you are painting. The colder it is the longer it will take to dry.
Sometimes my first layer of paint is pretty good and only needs minor adjustments on the second pass, I usually add extra depth to the darks and lights and sharpen up details. Sometimes if I am working on a much larger subject the first layer can be quite rough as it is good to get general values established across the image as a whole and not get caught up on details.
Cleaning Brushes
This is basic but I wish I had had someone to tell me how to do this properly in the beginning.
When you have finished painting for the day squeeze out as much of the paint as you can from the brushes using some kitchen towel. Get an old jar and pour some white spirit in. Keep this jar just for cleaning brushes. I have had mine on the go for years. You twizzle (sorry if that is not a proper word?) your brush against the side of the jar just under the surface of the white spirit. Keep doing this until the brush wipes off as clean as you can get on some kitchen towel. NEVER pour the white spirit down the drain! The paint particles in the jar of white spirit will sink to the bottom like sediment in a river and the next day the white spirit will be clear again as long as you leave the sediment layer undisturbed. I then wash the clean brushes with some washing-up liquid and warm water, rinse well and reshape the bristles/fibres of the brushes whilst they are wet. Leave to dry and they will be good as new the next day. I have brushes which have lasted for years with this cleaning regime.
I hope this has been helpful to you in your artistic journey and given you some encouragement in whatever your creative outlet is. It is an introduction into some of my basic practices and I will go into more specific areas in more detail in future posts and eventually on my YouTube channel.
Thanks for reading, stay tuned for Painting Botanicals In Watercolours coming in January 2021.